How to Clean a Moldy Coffee Maker: Discover the essential steps to thoroughly clean and disinfect your coffee maker, ensuring it remains mold-free and ready to brew fresh, delicious coffee every day. Learn how to use common household items like vinegar and baking soda to effectively remove mold and prevent it from coming back.
Why Mold Grows in Coffee Makers
Coffee makers, especially those with water reservoirs and intricate tubing, can easily become breeding grounds for mold. The combination of warmth, moisture, and the occasional leftover coffee creates an ideal environment for mold to flourish. Regular cleaning is essential to prevent this issue.
How to Clean a Moldy Coffee Maker

Cleaning a moldy coffee maker is a straightforward process that requires some basic household items. Here’s how to do it:
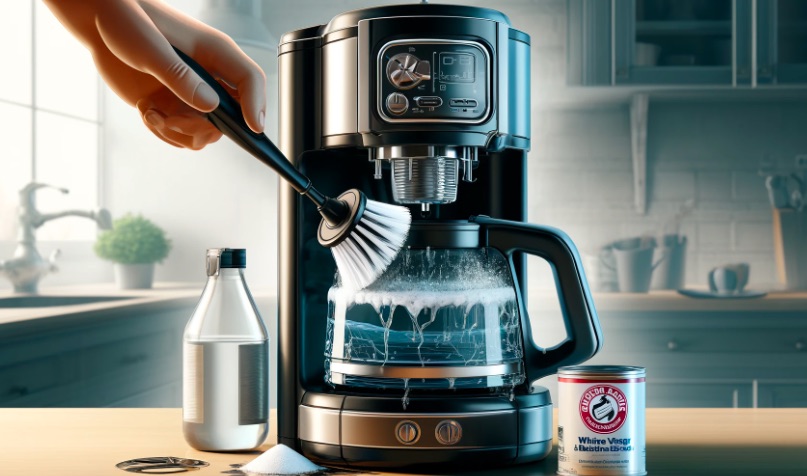
Gather Your Cleaning Supplies
You’ll need the following items to clean your coffee maker:
- White vinegar or lemon juice
- Baking soda
- A soft brush or sponge
- A clean cloth or paper towels
- Warm water
These ingredients are natural mold killers and will help you clean your coffee maker without leaving behind any harsh chemical residues and How to use coffee maker here.
Step 1: Empty and Disassemble the Coffee Maker
Start by unplugging the coffee maker and emptying any remaining water and coffee grounds. Disassemble the coffee maker, removing the water reservoir, coffee pot, and filter basket. Rinse each part under warm water to remove any loose debris.
Step 2: Clean the Water Reservoir
The water reservoir is a common place for mold to grow. Fill the reservoir with equal parts white vinegar and warm water, or use lemon juice as an alternative. Let the mixture sit for 15-20 minutes to break down the mold. Afterward, use a soft brush or sponge to scrub the inside of the reservoir, paying extra attention to any visible mold spots.
Step 3: Clean the Coffee Pot and Filter Basket
While the vinegar mixture is working on the reservoir, clean the coffee pot and filter basket. Sprinkle baking soda inside the coffee pot, then add a little warm water to create a paste. Scrub the pot with a sponge or brush to remove any mold and stains. Rinse thoroughly. For the filter basket, soak it in a vinegar solution for 10-15 minutes, then scrub and rinse well.
Step 4: Run a Cleaning Cycle
After cleaning the removable parts, it’s time to run a cleaning cycle through the coffee maker. Fill the water reservoir with a mixture of half white vinegar and half water. Place the coffee pot in its usual spot, and run a brewing cycle as if you were making coffee. The vinegar solution will clean the internal parts of the coffee maker, removing any mold and residue.
Step 5: Rinse with Fresh Water
Once the cleaning cycle is complete, discard the vinegar solution and rinse the water reservoir thoroughly. Fill the reservoir with fresh water and run another brewing cycle to flush out any remaining vinegar or mold particles. Repeat this step at least once to ensure your coffee maker is completely clean.
Step 6: Wipe Down the Exterior
Don’t forget to clean the exterior of the coffee maker. Wipe it down with a cloth dampened with warm water and a little vinegar. Pay attention to the buttons, handle, and any crevices where mold could be hiding. Dry the exterior with a clean cloth or paper towel.
Read more: Dutch Bros Kicher Recipe – 5 Min Recipe
How Often Should You Clean Your Coffee Maker?
To prevent mold from returning, it’s essential to clean your coffee maker regularly. Here are some general guidelines:
- Daily: Empty and rinse the coffee pot, filter basket, and water reservoir after each use.
- Weekly: Deep clean the coffee maker using vinegar and baking soda as described above.
- Monthly: Run a cleaning cycle with vinegar to keep the internal parts of your coffee maker mold-free.
Tips for Preventing Mold in Your Coffee Maker
Prevention is key when it comes to keeping your coffee maker mold-free. Here are some tips to help you avoid mold growth:
- Leave the lid off: After brewing coffee, leave the lid off the water reservoir and coffee pot to allow them to dry completely.
- Store in a dry place: Avoid storing your coffee maker in a damp or humid environment.
- Use filtered water: Filtered water can reduce mineral buildup and help prevent mold growth.
- Replace filters regularly: If your coffee maker uses filters, replace them according to the manufacturer’s recommendations.
Conclusion
Cleaning a moldy coffee maker might seem like a hassle, but it’s essential for your health and the taste of your coffee. By following the steps outlined in this guide, you can effectively remove mold from your coffee maker and keep it clean for future use. Regular maintenance and prevention will ensure that your coffee maker stays in top condition, providing you with fresh, delicious coffee every day.
I’m Jeff Olson, and I love coffee. In fact, I’m something of a professional about coffee. I own and operate coffeemachinenes.com, one of the web’s top resources for everything coffee-related. I’m also an avid home barista, and enjoy experimenting with different brewing methods and flavor profiles. When I’m not nerding out about all things coffee, you can find me playing guitar or spending time with my wife and kids.